There are a couple of "next best things after sliced bread" out there, and one of them is version control. Whether you are working on a solo project at home, or as part of a globally distributed team at a start-up or large corporation, version control software is an essential software configuration management tool.
What is Version Control
Version control is the process of tracking, updating and managing different versions of programs or files.
Benefits: ability to create workflows, work with different versions, collaborate on code and version history.
Git and Subversion (SVN) are two version control tools I've used, but this article will focus on Git since it's what I've used the most. The purpose of this post is to demonstrate how to use Git for version control with GitHub as the cloud-based hosting service...in a manner you'll want to keep using it in the long run (with the least amount of frustration) - I had to practice using the tool a few times before I became comfortable with it.
What you need
A PC or laptop
GitHub account (take a look at this guide if you don't have one yet ↓)
The plan
Git installation
Git configuration
Repository
Getting started with Git and GitHub
Git installation
To get started with Git follow the steps below to install the software.
Step 1: Navigate to the official Git download page and select the download appropriate for your operating system.

The above image is an illustration to navigate to git-scm.com/downloads.

The above image is an illustration to navigate to git-scm.com/downloads.
Step 2: It should only take a few seconds to download the setup file, depending on your internet connection speed.
Step 3: Locate the Git setup file on your PC/laptop and double-click on it to begin the installation process.

Step 4: Click “Next” a couple of times when prompted until it says “Please wait while Setup installs Git on your computer.“

Step 5: Click “Next” a couple of times when prompted until it says “Please wait while Setup installs Git on your computer.“


Step 6: The Git Bash window should launch by itself. Alternatively, you can still open Git Bash by right-clicking on the desktop or inside a directory of your choice and selecting Git Bash Here from the menu option.

Git configuration
As a first step in using Git, we'll use the git config command to create a global username and password.
Step 1: To configure a username, enter the command below in the Git Bash window.:
git config --global user.name "skogsglaenta"
Step 2: To configure an email type:
git config --global user.email "username@gmail.com"
Step 3: To configure a password type:
git config --global user.password "anypaswd123"
Step 4: To save your entries type:
git config --global credential.helper store
That's all there is to configuring a username, email address, and password in Git Bash.
Getting started with Git and GitHub
The repository
The fun part begins in this section with the creation of a new repository which will be hosted on GitHub.
Repositories (or repo for short) are essentially locations where information or data of some type (such as code) is stored. The data will be transferred to GitHub, our preferred distributed cloud system, using Git Bash for version control.
Step 1: Navigate to the directory where the new folder will be created, for example, C:/Users/skogsglänta/Desktop.
Step 2: Start by typing mkdir <folder name>

Now that we've created a local repo, we need to upload it to the cloud...no, not the kind that floats in the stratosphere ⛅, but rather GitHub, the popular Open Source cloud-based software that makes it possible for developers, programmers, and designers to collaborate with one another, regardless of the size of the project or team. This is especially useful for remote teams working together to create amazing software!

The above image is an illustration of version control.
Step 3: Change into the directory of the new repo by typing cd <folder name>

Step 4: To add a new file to the repo, type touch <file name>

Step 5: Initialize the repo with the command git init
Step 6: Commence with writing data in the new file i.e print(“Hello World“)
Step 7: Type git add . in Git Bash to add the new content to the file

Step 8: Type git commit -m "first commit" to commit the changes

If you already had a repository, just repeat steps 5–8.
Let’s get this local repo to the cloud…
Step 1: Log into your GitHub account
Step 2: Click on the profile icon in the upper right corner, then select "Your repositories."

Step 3: To create a new remote repository, click the "NEW" green button

Step 4: Fill in the details for the repository and then click the "Create repository" button

Step 5: Click the "Code" button on the repo's main page to reveal the repo URL.

Step 6: Copy the URL

Step 7: To link the local and remote repositories, use the command git remote add origin remote repo URL>

Step 8: Type git push -u origin master to push the local file with changes to the remote repo.

That's all there is to it! In this post, you learned how to use Git Bash for version control to create a local repo with a file, configure your user credentials, launch the local repo, and connect it to one hosted on GitHub!
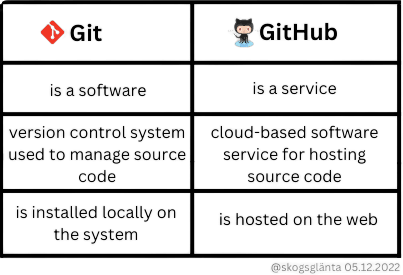
Takeway (๑ᵔ⤙ᵔ๑): Git & GitHub are two distinct tools that serve different purposes.
Thank you for reading. Happy coding!


